AWS ECR Connector
For AWS ECR you’ll need to create a connector to connect to your AWS account.
Create Connector for AWS ECR Registry
1) In the Container Security UI, go to Assets > Registries and click New Registry.
2) Pick AWS ECR from the Registry Type menu.
3) Choose a region from the Region menu. For an AWS GovCloud registry, you must pick one of the US GovCloud regions. You can choose "US East (GovCloud)" or "US West (GovCloud)". When you pick a US GovCloud region, you'll also need to select the US GovCloud account type in the connector details (see Step 6).
4) Click Create New next to the Connector field.
5) On the Connector Details page, give your connector a name, and provide a description (optional).
6) Choose the account type - Global or US GovCloud - that corresponds to the region you selected in Step 3. Pick Global if you selected a standard AWS region. Pick US GovCloud if you selected a US GovCloud region. Your selection will determine the Qualys AWS Account ID and External ID that will be used.
7) Take note of the Qualys AWS Account ID and External ID in the connector details for your subscription. Continue with the steps below to create a role for cross-account access using the connector details provided. (Note that the steps you need also appear in the UI, on the right side of the Connector Details screen.)
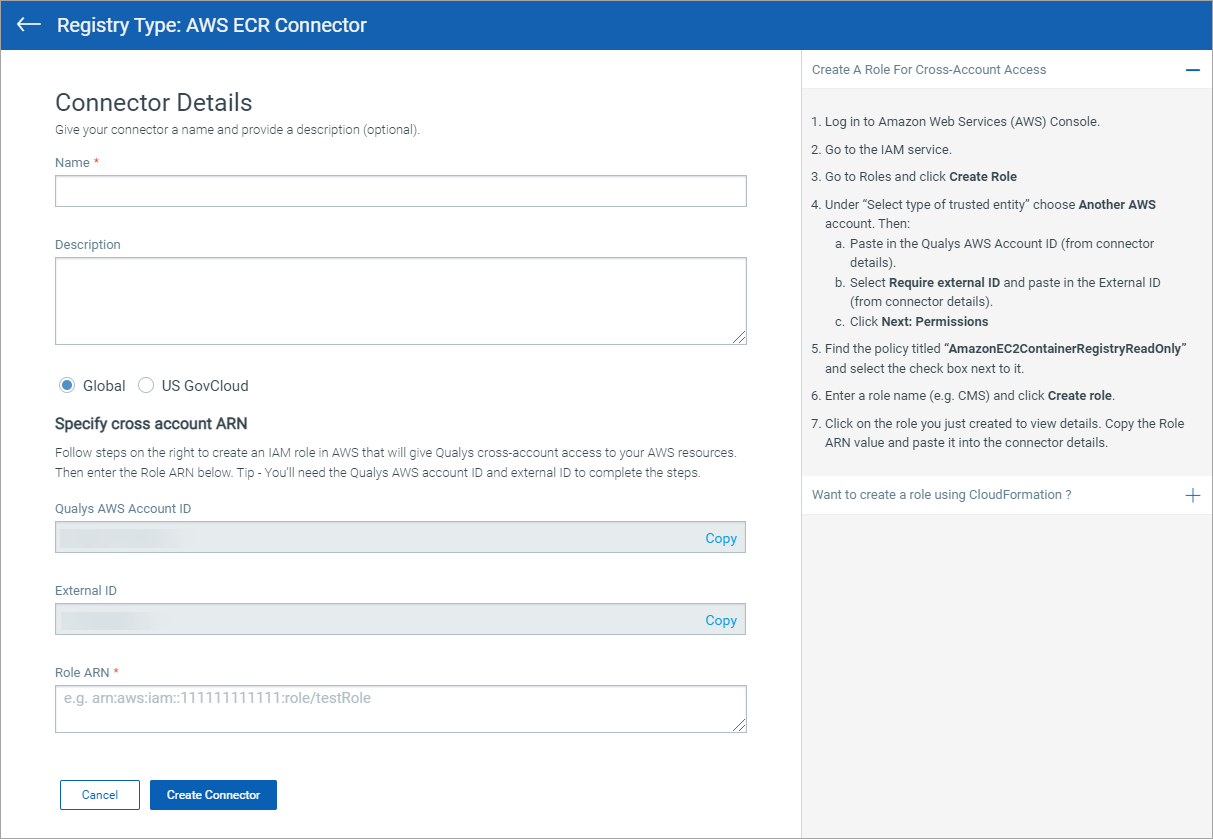
Create a Role for Cross-Account Access
1) Log in to Amazon Web Services (AWS) Console.
2) Go to the IAM service.
3) Go to Roles and click Create Role.
4) Under “Select type of trusted entity” choose Another AWS account. Then:
- Paste in the Qualys AWS Account ID (from connector details).
- Select Require external ID and paste in the External ID (from connector details).
- Click Next: Permissions.
5) Find the policy titled “AmazonEC2ContainerRegistryReadOnly” and select the check box next to it. We recommend you use this default AWS policy. If you want to use a custom policy, see important details below.
6) Enter a role name (e.g. CMS) and click Create role.
7) Click on the role you just created to view details. Copy the Role ARN value and paste it into the connector details.
Using a Custom Policy?
To use a custom policy and to match all repositories that belong to a specific account, you can use a wildcard (*) when defining the Resource JSON policy element. See the proper formatting for the JSON below. Note that there are two statements defined inside the Statement element. Both statements must be present. You’ll also need to replace the region and account number (shown in bold red) with appropriate values.
Define your policy first and then follow the steps outlined above to create a role for cross-account access using the Qualys AWS Account ID and External ID from the connector details in the Container Security UI. In Step 5, pick your custom policy instead of “AmazonEC2ContainerRegistryReadOnly”.
After creating the custom policy, finish the role creation with step 6 and 7.
Policy JSON:
{
"Version": "2012-10-17",
"Statement": [
{
"Sid": "Statement1",
"Effect": "Allow",
"Action": [
"ecr:GetDownloadUrlForLayer",
"ecr:BatchGetImage",
"ecr:DescribeImages",
"ecr:ListImages",
"ecr:GetRepositoryPolicy"
],
"Resource": "arn:aws:ecr:us-west-1:123456789012:repository/*"
},
{
"Sid": "Statement2",
"Effect": "Allow",
"Action": [
"ecr:DescribeRepositories",
"ecr:GetAuthorizationToken"
],
"Resource": "*"
}
]
}